
How to Prep Walls for Painting: The 80% That Decides Everything
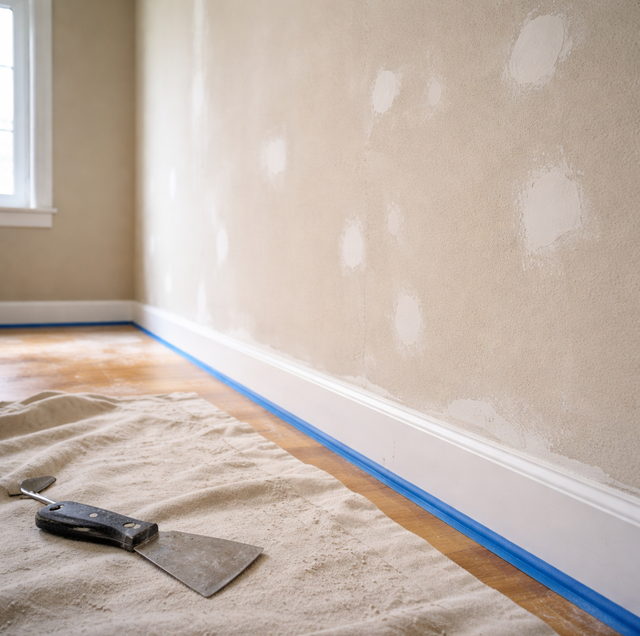
Quick Answer: Good wall prep runs in order: clear and protect the room, clean and degrease the walls, scrape loose paint, fill holes and caulk gaps, sand the patches flush and scuff any gloss, wipe off all dust, then spot-prime bare and stained areas. Prime the whole wall only for new drywall, big color changes, porous or stained surfaces, or glossy paint.
A fresh coat of paint gets all the attention, but the finish you actually see is decided long before the roller touches the wall. Paint is a coating, not a filler and not a glue that grabs anything underneath it. It bonds and flows out smoothly only over a surface that is clean, sound, and correctly primed. Skip that groundwork and the new color will telegraph every flaw beneath it: bumps from dust, halos around old stains, ridges where filler was not sanded flat, and edges that peel within a season.
Why Prep Is Roughly 80% of the Result
Most of a lasting paint job is invisible in the final photo. The rolling itself is fast and forgiving; the surface underneath is neither. Fresh paint is a thin, flexible film that mirrors whatever it lands on. It cannot hide texture; it will not stick to a slick or greasy layer, and it soaks unevenly into raw patches so those spots dry with a different sheen from the rest.
A wall is a lot like the ground under a driveway. Pour a smooth slab over soft, uneven fill and the surface cracks and sinks no matter how good the concrete is. The prep is the ground; the paint is the slab. Get the base right and even a modest paint performs well. Get it wrong, and the best paint on the shelf still fails early.
That is why professionals budget most of a repaint for the steps before color. The sequence below is the order that experienced painters actually follow, and each step exists because skipping it shows up later.
Clear and Protect the Room First
Prep starts with the room, not the wall. Move furniture to the center and cover it, or take it out entirely so you have room to work and reach corners without stretching over obstacles.
Lay down protection: Canvas drop cloths stay put and absorb drips better than thin plastic, which gets slick underfoot and slides around. Cover the full floor along each wall you are painting, not just a narrow strip.
Mask what stays: Run painter's tape along trim, baseboards, window casings, and the ceiling line where you want a clean edge. Press the tape down hard with a putty knife so paint cannot creep under it. Remove switch and outlet covers rather than taping around them; the finished wall looks far cleaner without paint ridges framing every plate.
Doing this now, before any dust or filler, keeps the mess contained and gives you clear footing for the steps that follow.
Clean the Walls So Paint Can Grip
Walls collect an invisible film of dust, skin oil, cooking grease, and hand marks, and paint will not bond to any of it. Cleaning is the step most people skip and the one that quietly ruins adhesion.
Dust first: Wipe the whole surface with a dry microfiber cloth or a vacuum brush attachment, working top to bottom. Pay attention to the tops of baseboards and the corners where dust settles.
Degrease the dirty zones: Kitchen and bathroom walls carry grease and soap residue that a dry wipe leaves behind. Wash those areas with a mild household cleaner or a TSP substitute mixed to the label's directions, then rinse with clean water so no cleaning residue is left to interfere with the paint. Wear gloves and eye protection; even the milder TSP-free products are hard on skin and eyes.
Let everything dry fully before you move on. Painting or priming over a damp wall traps moisture and invites peeling.
Scrape, Fill, and Caulk
With the wall clean, deal with the damage. Work in this order so each repair sets up the next.
Scrape loose and flaking paint: Run a stiff putty knife or paint scraper over any bubbling, cracking, or peeling areas until only tight, well-bonded paint remains. Feather the edges of the scraped spots so the transition is not a hard cliff the new paint has to bridge.
Homes built before 1978 may have lead-based paint under newer layers. Do not dry-scrape or dry-sand those surfaces until the paint has been tested, and follow lead-safe practices if lead is present. When in doubt, have it checked first.
Fill holes, dents, and cracks: For small nail holes and dings, lightweight spackle dries fast and sands easily. For larger gouges or wide cracks, joint compound gives you more working body and can be built up in thin layers rather than one thick glob that shrinks and cracks. Press filler in so it is slightly proud of the surface, since it settles a little as it dries.
Caulk the gaps at trim. Where baseboards, casings, and crown meet the wall, a bead of paintable acrylic-latex caulk closes the thin shadow lines and gives a crisp, finished look. Smooth the bead with a damp fingertip and wipe away the excess. Caulk fills gaps between two surfaces; it is not a substitute for spackle in the middle of a wall.
Sand Flat and Scuff the Gloss
Sanding does two jobs: it levels your repairs, and it gives slick surfaces a texture the new paint can hold onto.
Sand the filler flush: Once patches are fully dry, sand them level with the surrounding wall using a medium-grit paper (around 120) to knock down the high spots, then a finer grit (150 to 180) to smooth the edges so no ridge shows through the paint. Run your hand across each patch with the lights on; your fingertips catch ridges your eyes miss.
Scuff-sand glossy areas: Semi-gloss and gloss paint, along with old oil-based finishes, are too slick for new paint to grab. Lightly sanding them dulls the shine and creates fine scratches, called tooth, that give the next coat something to bite into. You are not stripping the paint, only taking the sheen off.
Wear a mask or respirator while sanding. The fine dust is irritating to breathe, and it matters even more if any older paint is involved. Open a window and keep the room ventilated.
Wipe Off the Dust, Then Prime
Sanding leaves a coat of fine powder across everything, and paint will not stick to dust any better than it sticks to grease.
Remove every trace of dust: Wipe the walls down with a tack cloth or a well-wrung damp rag, then let the surface dry. A vacuum with a brush head clears the baseboards and floor edges where dust piles up. Do not rush this; a hazy film left on the wall becomes a gritty, poorly bonded finish.
Spot-prime the trouble areas: Primer seals raw and repaired spots so they absorb paint at the same rate as the rest of the wall and do not flash a dull patch through the color. Hit every bare drywall patch, every filled and sanded repair, and any scuffed glossy area.
Match the primer to the problem:
Stain-blocking primer locks down water rings, smoke and soot, marker, and grease shadows so they cannot bleed up through the new paint. A water stain painted over with ordinary paint reappears within days; a shellac- or oil-based stain blocker stops it for good.
Bonding primer is built to grip slick, hard-to-coat surfaces like glossy trim, previously oil-painted walls, tile, or laminate. Where scuff-sanding alone is not enough, a bonding primer gives the topcoat a reliable anchor.
Wear a mask and keep the room ventilated while priming, especially with shellac- or oil-based products, which carry strong fumes.
Spot-Prime or Prime the Whole Wall
You do not always need to prime edge to edge. Spot-priming the repairs is enough for a routine repaint in a similar color over sound, previously painted walls.
Prime the entire surface when:
- The wall is new, unpainted drywall, which drinks up paint unevenly across the paper and the joint compound seams.
- You are making a big color change, especially light over dark, where a tinted primer cuts the number of finish coats.
- The surface is porous or stained across a wide area, so patchy sealing would still telegraph through.
- The old finish is glossy overall, and a full bonding coat is the safest path to adhesion.
When you are unsure, priming the whole wall is the safe call. It costs you a coat of work and buys an even, predictable base.
Check Your Work in Good Light
Before the first drop of color, walk the wall with a bright light held at a low angle so it rakes across the surface, and shadows exaggerate every flaw. That is where you catch the sanding ridge you missed and the dust you thought you wiped off, while it is still easy to fix.
Fix what the light reveals now. Every defect you leave gets locked under the paint and grows more obvious once the wall dries to a uniform sheen. Working on a ladder for high walls and ceiling lines carries a real fall risk, so keep it on stable footing and do not overreach; move the ladder instead of leaning off it.
Frequently Asked Questions
Lightweight spackle in a shallow nail hole can be ready to sand in under an hour, but a deep fill or joint compound built up in layers needs each layer to dry before the next, often several hours apiece. Acrylic-latex caulk usually needs a few hours before painting, though a thick bead in a cool, humid room takes longer. The reliable test is color: many spackles and caulks go on slightly darker and lighten as they cure, so wait until the patch has fully turned to its dry shade before you sand or coat it.
Self-priming paints work well as a repaint over a sound, clean, similar-colored wall, which is exactly the case where you would only spot-prime anyway. They do not replace a dedicated primer on the hard jobs: raw drywall, stain-blocking over water or smoke damage, or bonding over glossy and oil-painted surfaces. On those, a separate specialty primer still outperforms an all-in-one, because one product cannot be optimized to both block stains and grip slick surfaces at once.
Use a coarser grit only where you have real material to remove: around 100 to 120 for knocking down proud filler or a rough repair. Step up to 150 to 180 for smoothing patch edges and for scuff-sanding glossy paint, since a fine grit dulls the sheen without leaving deep scratches that show through the topcoat. Skipping straight to fine grit on a thick patch just wears out the paper; jumping straight to coarse grit on gloss leaves scratch marks you will see under low light.
A wall can look spotless and still carry an invisible film that wrecks adhesion. Kitchen walls hold a thin layer of airborne cooking grease well beyond the stove, and any wall at hand height collects skin oils from being touched. Neither shows until fresh paint refuses to bond over it and peels at the edges. A quick dust everywhere plus a degreasing wash in kitchens and baths is cheap insurance against a finish that lifts within months.
Wallpaper should come off rather than be painted over; moisture in the paint can loosen the adhesive and lift both layers together, and the seams telegraph through. Remove it, wash off the old paste residue, and prime the bare wall before painting. For a glossy accent wall, scuff-sand the whole surface to kill the sheen, wipe the dust, and roll on a bonding primer edge to edge, since spot-priming a uniformly glossy wall would leave adhesion gaps between the primed and unprimed areas.
Peeling in those spots almost always traces to moisture and skipped prep rather than bad paint. Bathrooms and the tops of walls near the ceiling collect humidity and condensation, and paint applied over a damp, dusty, or unwashed surface never fully bonds, so it lets go first where moisture is worst. The fix is prep, not more coats: clean and degrease, let the wall dry completely, spot-prime bare and repaired areas, and in a bathroom, reach for a moisture-tolerant paint designed for high-humidity rooms.
Book a free estimate before your next repaint — get walls prepped right so the color lasts. Elite Edge Painting & Remodeling serves Parkville, Baltimore, and Towson. Call (443) 601-5233.
