
How to Paint Kitchen Cabinets for a Finish That Lasts
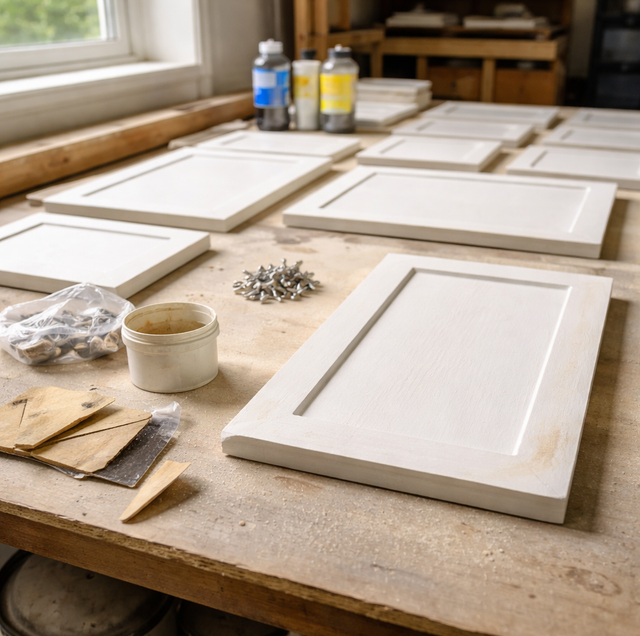
Kitchen cabinets take more punishment than almost any other painted surface in a home. Fingers drag across the doors near the pulls, cooking grease drifts up and settles into the finish, and steam from the sink and stove keeps the wood cycling between damp and dry. A finish that looks flawless on day one has to survive all of that for years. The difference between a cabinet job that still looks sharp after a decade and one that chips at the edges within months comes down almost entirely to what happens before the color goes on.
Quick Answer: A lasting cabinet finish is built in this order: label and remove the doors and hardware, degrease every surface with a strong cleaner, scuff-sand and fill dents or open grain, apply a bonding or stain-blocking primer, then lay down thin coats of a durable cabinet-grade enamel with light sanding between them. Let the final coat cure fully before reassembly.
Why Painted Cabinets Fail
Most cabinet repaints that go wrong fail for one of three reasons, and all three are avoidable.
The first is grease. Cooking oils form an invisible film across cabinet faces, heaviest around the stove and above the range hood. Paint and primer cannot grip through that film. When someone paints straight over it, the coating sits on top of the grease instead of the wood, and it peels away in sheets the first time a door catches a fingernail.
The second is skipped sanding. Factory cabinets and older repaints usually carry a slick, cured topcoat. A new coat needs a roughened surface to key into. Without scuffing, even good primer struggles to hold, and the finish flakes at the corners and edges where stress is highest.
The third is the wrong paint. Standard wall paint stays slightly soft even after it dries. On a cabinet, that softness means blocking, where a closed door sticks to the frame and tears when opened, plus scuffs and dents from ordinary use. Cabinets need a coating engineered to dry hard.
Fix those three things and the finish has a real chance of lasting.
Prep Is Most of the Job
Painting cabinets is roughly eighty percent preparation. The actual color goes on quickly. Everything before it determines whether that color stays put.
Label and Remove Doors and Hardware: Take the doors and drawers off rather than painting them in place. Off the cabinet, they lay flat, which lets the paint level into a smooth surface instead of sagging into runs on a vertical face.
Number each door and its matching frame opening with tape and bag the hinge screws for each. A door that has hung on the same hinges for years has settled into that exact spot, so swapping doors during reassembly leads to uneven gaps and misaligned pulls.
Degrease Every Surface: This is the step that gets rushed most and matters most. Wipe down every door, drawer front, and frame with a strong grease-cutting cleaner such as a trisodium phosphate substitute or a dedicated degreaser, following the product's dilution and rinse directions. Work in overlapping passes and change your rag often, because a greasy rag just moves the film around. Pay extra attention to the run of cabinets nearest the stove, where buildup is worst. Rinse with clean water if the product calls for it, and let everything dry completely before you touch sandpaper to it.
Scuff, Sand, and Fill: Once the surfaces are clean and dry, scuff-sand every face you plan to coat with a fine-grit paper or sanding sponge, around 220 grit. The goal is not to strip the old finish down to raw wood but to knock the sheen off so primer has tooth to grab. Fill any dents, gouges, or old hardware holes you are relocating with a wood filler, let it set, and sand it flush.
Open-grained woods like oak show a deep grain texture that telegraphs straight through paint. If you want a smooth, modern look on oak, skim the grain with a thin layer of filler or grain sealer and sand it back before priming. Wipe away every trace of sanding dust with a vacuum and a tack cloth, since dust trapped under primer shows up as grit in the final finish.
Cabinets painted before 1978 may carry lead-based paint underneath, and sanding it releases hazardous dust. Test suspect surfaces with a lead test kit before you sand. If a test comes back positive, stop and bring in a certified professional rather than sanding it yourself.
Prime for Adhesion and Stain Blocking
Primer is what bonds the whole system to the cabinet. Choose it for the job in front of you.
A bonding primer is built to grip slick, previously finished surfaces and gives topcoat something reliable to hold. A stain-blocking primer, often shellac- or oil-based, seals in tannins and old stains that would otherwise bleed yellow-brown through a light-colored paint, which matters on woods like knotty pine and on cabinets stained dark. Some primers do both jobs; read the label for your specific situation.
Apply primer thin and even, and let it dry for the full time the manufacturer lists before sanding lightly with fine paper and wiping clean. A cabinet is a bit like a house foundation: the layer you never see once the job is done is the one holding everything above it in place.
Ventilation matters here: Shellac- and oil-based primers give off flammable, strong-smelling fumes. Open windows, run a fan, and wear a respirator rated for solvent vapors, not a simple dust mask. Keep these products away from open flames and pilot lights.
Choose a Durable Cabinet Enamel
The topcoat is where cabinet paint differs most from wall paint. Reach for a cabinet-grade enamel formulated to dry hard and level smooth. Waterborne alkyd and acrylic-alkyd enamels are popular for exactly this reason: they flow out like an old-school oil paint for a glassy surface but clean up with water and yellow far less over time. They also cure to a tough film that resists the blocking and scuffing that ruin softer paints.
A satin or semi-gloss sheen is the usual pick for cabinets. The slight shine wipes clean easily and shrugs off fingerprints better than a flat finish, which grabs grime and cannot be scrubbed as hard.
Apply Thin Coats and Let Them Cure
However you put the paint on, the rule is the same: several thin coats beat one thick one every time. Thick paint sags, traps solvent, and stays soft underneath.
Brush and Roll: For a brush-and-roll approach, cut in the recessed panels and profiles with a quality synthetic brush, then immediately roll the flat areas with a fine foam or microfiber roller to knock down brush marks while the paint is still wet. Work one door at a time so you can level each surface before it starts to set.
Spray: A sprayer lays down the smoothest, most factory-like finish, especially across large flat doors, but it demands full masking of everything you are not painting and comes with its own hazards. Atomized paint drifts everywhere and is easy to inhale, so wear eye protection and a proper respirator, and work in a well-ventilated space away from ignition sources.
Sand Between Coats and Respect the Cure: After each coat dries, scuff it lightly with very fine sandpaper, around 320 grit, and wipe off the dust before the next coat. That light sanding gives each layer a surface to bond to and removes any bits of dust or texture, so the finish gets smoother as it builds.
The step people skip is full cure time. Paint that is dry to the touch is not yet fully hardened. Many cabinet enamels feel dry in hours but take days or weeks to reach full hardness. Rehang the doors once the paint is firm, but treat the surfaces gently, no scrubbing and no heavy contact, until the coating has cured completely. Closing a door onto a not-quite-cured frame is the fastest way to fuse the two and tear the finish.
Reassemble With Clean or New Hardware
Once the paint has hardened, rehang the doors using your labeled bags so every piece returns to its original opening. This is the natural moment to upgrade the hardware, since fresh pulls and hinges are the cheapest way to make a repainted kitchen read as brand new. If you are reusing the old hardware, soak it in the same degreaser you used on the cabinets to strip off years of hand oils before it goes back on.
Adjust the hinges so the doors hang evenly with consistent gaps, and check that nothing rubs. Done right, from prep through cure, a painted cabinet finish stands up to daily kitchen life for years.
Frequently Asked Questions
Bare or previously finished cabinets almost always need a dedicated primer. Self-priming paints are formulated for surfaces that already hold paint well, like drywall, and they do not block tannin bleed from woods such as knotty pine or grip glossy factory finishes reliably. A separate bonding or stain-blocking primer does a job the combined products are not built for.
Follow the recoat window on your specific can, but a common range for waterborne cabinet enamels is a few hours in normal room conditions. Recoating too soon traps solvent and leaves the film soft, while high humidity and cool temperatures both stretch the wait longer than the label's ideal figure. When unsure, err toward waiting.
Laminate and thermofoil are non-porous plastic surfaces, so they need a primer specifically rated to bond to slick materials, not a standard wood primer. Scuff them thoroughly first. Thermofoil in particular can peel from its substrate near heat sources like the oven, and no paint fixes an already-lifting foil layer, so repair or replace those doors before coating.
Grittiness almost always means airborne dust settled into the wet paint. Cabinet finishing is sensitive to a clean workspace, so let sanding dust settle and vacuum before painting, keep foot traffic down while coats dry, and lay drying doors flat in a low-dust room. A light sand with 320 grit followed by a final coat clears up minor grit.
Satin and semi-gloss are the practical choices. Semi-gloss is the most scrubbable and hides fingerprints better around the pulls, while satin reads slightly softer and hides minor surface flaws more forgivingly. Flat and matte finishes look elegant but hold onto grease and cannot take repeated cleaning, so they are a poor match for cabinets near a stove.
Yellowing usually comes from two sources: oil-based topcoats that amber as they age, and tannins bleeding up from the wood. A waterborne acrylic-alkyd enamel resists ambering far better than a traditional oil enamel, and a quality stain-blocking primer underneath stops tannin bleed from the wood below. Cabinets over a gas range also yellow faster from combustion residue, so wiping them down periodically helps.
Ready for a cabinet finish that holds up to real kitchen life — book a free color and finish consultation with a crew that preps it right. Elite Edge Painting & Remodeling serves Parkville, Baltimore, and Towson. Call (443) 601-5233.
